Results Day Pre-Checks
This guide refers to exam results days in August 2025. Guidance for 2026 is expected in June 2026.
These checks are optional but recommended to ensure you're fully prepared for results days. In this topic:
- Check your MIS connection
- Preparing a results series to match CYPMD
- Course checks
- Subject checks
- Custom groups
- Results Embargo
- Useful links
If your school does not use Arbor or Bromcom, or you plan to import data using the Desktop Migrator tool or via a spreadsheet, you can skip to Course Checks
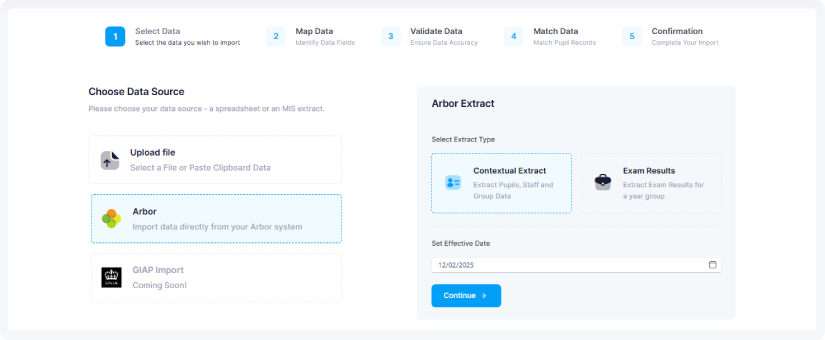
1. Check your MIS connection
Go to Admin > Import Data and confirm that you see the MIS logo on the left side of the screen. If you do not see your MIS logo, please log a support ticket and we will help you complete the connection.
2. Preparing a results series to match CYPMD
Prepare a series ready to import your results into on results day which includes the correct students and demographics as compared to your CYPMD
-
First, ensure your 4Matrix Cloud data is up to date for Year 11 by running an MIS extract. Do this via Admin > Import > MIS using an ‘Effective Date’ of 26th June 2025 – this will ensure your demographics are all up to date.
-
Combine your CYPMD ‘Included’ and ‘Not Included’ files in a single spreadsheet so that all students are on a single tab.
-
Go to Admin > Import Data and create a new series for your results. Ensure that the Series Date is set to to the day before students went off roll: 26th June 2025
-
When mapping, do not include the demographic columns. You can mark these as 'Not Included'.
-
Go to Admin > Series and click on the new results series to open it – then select the Pupils tab.
-
Select Enable Edit Mode and tick all students who appeared on your CYPMD ‘Not Included’ file. Using the Bulk Actions menu, select ‘Not Included’. These students are now not included in KPIs but still visible. You can remove them entirely from all analysis tools by also selecting ‘Not Visible’ from the Bulk Actions menu. Click Save when complete.
-
For late joiners (not shown in either of the CYPMD files), select ‘Visible’ only if you’d like to see their results but exclude them from KPIs. Click Save.
-
Now tick all students (select all in one go using the select box in the top row of the table) and using Bulk Actions, choose Populate fields by date and add Census date 16/01/2025.
-
Click Save to apply all changes. This should now match the demographics to Census Day/CYPMD.
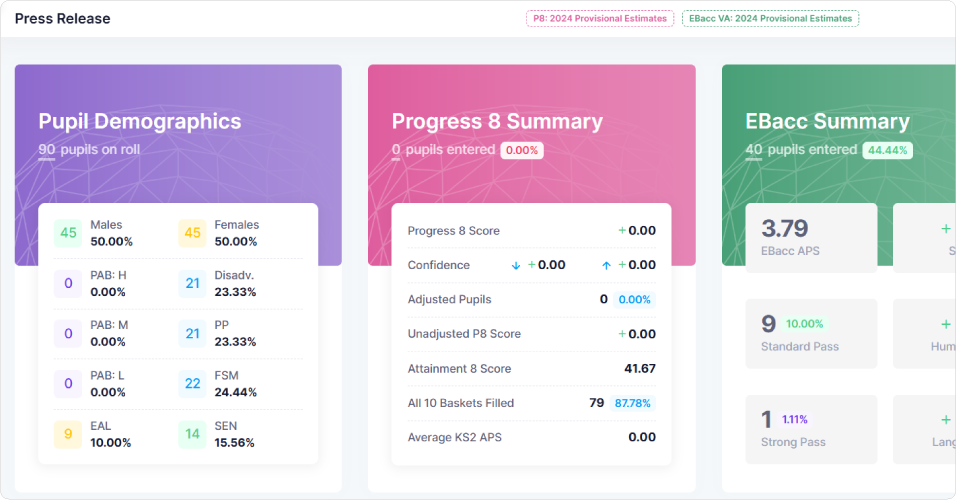
Open your new series and navigate to the Press Release page. In the Pupil Demographic panel (the purple section) check that the cohort and demographic numbers match your CYPMD. You can make further checks within the KPI page by expanding each demographic row to reveal the students.
3. Course checks
Check Courses are mapped to the correct QANs, a consistent naming convention is used, and each course has a ‘Linked Timetable Subject’
- Go to Admin > Series and select the latest series for the current cohort.
- Screengrab the list of Linked Courses and pass this to your Exams Officer to confirm that all courses are present and QAN codes are correct.
Please note that you can only add qualifications that are included in the DfE Approved Qualifications. It is not yet possible to import non-counting qualifications into 4Matrix Cloud.
- Go to Admin > Courses.
- Select each course in turn, checking the Linked Qualification mapping and Linked Subjects.
- Add any missing Courses using the Add New Course wizard, ensuring that you ‘link’ a subject and add the relevant QAN code.
- For Courses that require a new QAN, click on +Add Qualification to add any missing QANs in addition to any already present.
- Check all remaining courses have Linked Subjects, add if they are not set.
Linking Subjects is essential to ensure that the correct classes appear in ‘course’ related pages.
4. Subject checks
Check your Subjects have a Subject Leader assigned
- Go to Admin > Subjects and work through the list of timetabled subjects. Check that each subject has the following, and amend if necessary:
- A Subject Leader
- One or more Subject Courses (e.g.: English may be linked to both English Language and Literature)
- Linked classes; these should be visible if there are any timetabled classes in the current AC Year
5. Custom Groups
Check your Custom Groups are set up as required
- Go to Admin > Groups and filter on Group Type > Custom > Search to review existing groups.
- To create a new custom group, click +Add Group and follow the wizard, ensuring that you select Custom in the Type dropdown.
- Open each group and check the members, edit their start/end dates and add new members.
- You can also click on +Add Staff so that groups will appear on their landing page.
- Groups can be used to filter all pages within 4Matrix Cloud. These can be existing groups across multiple years or specific to Year 11.
6. Results Embargo
GCSE results are released on Wednesday 20th August 2025 with the strict understanding that the results will remain entirely confidential to the Head of Centre, examinations office staff and senior members of teaching staff. This embargo of results is lifted on Thursday 21st August 2025 at 9.30am, after pupils have received their results. Further details of the embargo are in the JCQ Release of Results June 2025 document
We recommend setting the exam results series so that it is visible only by Admin and SLT users on 13th and 20th August (GCE and GCSE results days). You can set which roles can see a series in Admin > Series > Visibility. You can also create a custom Exams Embargo role - this can be managed in Admin > Roles.
- Add New Role > Permissions – expand the school section and select the pages you want to share on download day then select Create.
- In the new role click on Members > +Add Users. Select the required users and Assign Members to the group.
Visibility settings can also be edited per series in the Admin > Series tool. Select the applicable series and use Bulk Actions > Apply Role and select the relevant role before and after the embargo.

7. Useful links
- DfE KS4 Approved Qualifications
- EBacc Qualification
- DfE KS4 Accountability Measures
- JCQ Release of Results June 2025 document
If you require any assistance with these checks or require further advice, please contact us via the helpdesk.
- First published: 17/07/2025
- Last revised: 15/08/2025