Results Day Guidance
This guide refers to exam results days in August 2025. Guidance for 2026 is expected in June 2026.
This guide provides key information for results days. In this topic:
- Contacting us and getting help
- Preparation
- Embargoing your exam results series
- Import options
- Importing your results
- Performance measures notes
- Checking your headline figures
- Producing reports
- Useful links
Contacting us and getting help
Our live chat and ticket support services will be available from 8am to 5pm on the following dates:
- Wednesday 13th August (GCE Results)
- Thursday 14th August (GCE Results)
- Wednesday 20th August (GCSE Results)
- Thursday 21st August (GCSE Results)
Our support services will be available 9am – 3pm for the rest of the holiday period.
Getting Support: Go to the 4Matrix Helpdesk to log a support ticket. When logging a ticket, include details of the problem and attach screenshot(s) of any error messages.
4Matrix Live Chat: Go to our 'old' website - use the green chat box, bottom-right.
We will prioritise and respond to all live chats and tickets as quickly as possible. Please try to avoid telephoning us unless you have a serious technical issue and/or cannot access 4Matrix.
Preparation
- We recommend completing the checks in the Pre-Checks article.
- It is important that users familiarise themselves with the import process prior to results days. We will be unable to provide support for basic training on these days.
- Check 4Matrix Cloud is linked to your MIS - this is also covered as the first step of the Pre-Checks article.
Embargoing your exam results series
- It is important to check the Visibility setting for all series in 4Matrix that contain results. This can be done in the Admin > Series tool.
- We recommend setting the exam results series to Admin and SLT roles only on 20th August, but you can also create a custom Exams Embargo role. This can be managed in Admin > Roles.
- The Series Role setting can be applied at the time of series creation and can also be viewed and amended later in the Admin > Series tool.
- Once the candidates have received their results you can then change the visibility to all roles, in line with JCQ regulations.

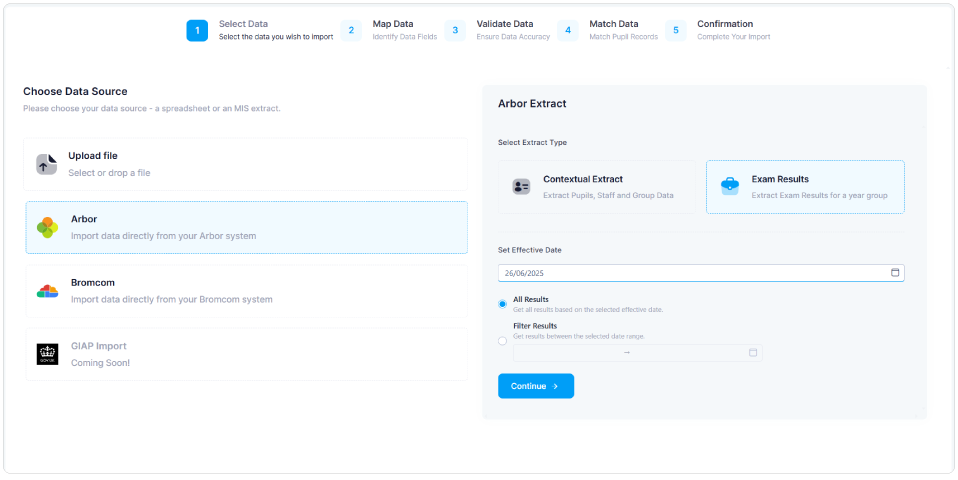
Import options
There are 3 options for importing results into 4Matrix Cloud:
- Direct MIS Import – quickest and easiest method
- Spreadsheet import - for users without an MIS Connection or partial results in the MIS
- Desktop Migrator - for SIMS users
Unless you are a SIMS school, we do not recommend using the Desktop Migrator tool to import exam results into 4Matrix Cloud. This may create duplicate Courses if you have edited the Course names in 4Matrix Cloud since your first migration.
Importing your results
Exam results stored in the exams area of your MIS will be picked up in the 4Matrix MIS Extract. Alternatively, you can import your results from a spreadsheet. This section provides a quick-start guide to the import process.
1. Starting the import
- Go to Admin > Import Data and choose your MIS logo, or choose Upload File and open your spreadsheet
If running an MIS extract:
- Select the Exam Results option.
- Set the Effective Date.
Important: Set the Effective Date to the January Census date: 16th January 2025. An MIS results extract DOES NOT add or change demographic start and end dates, it only sets the true/false flags in the Series Pupils table. All groups are imported with memberships according to the Effective Date.
MIS Results options:
- If importing KS4/GCSE results: Leave All Results checked and click Continue
- If importing KS5/A Level results: Select Filter Results and set the date range to 01/09/2023 and 13/08/2025. This will prevent GCSE results coming through for this cohort. (The feature to import KS5 data is expected to launch during A Level results week)
Click Continue to move on to the series creation/selection step.
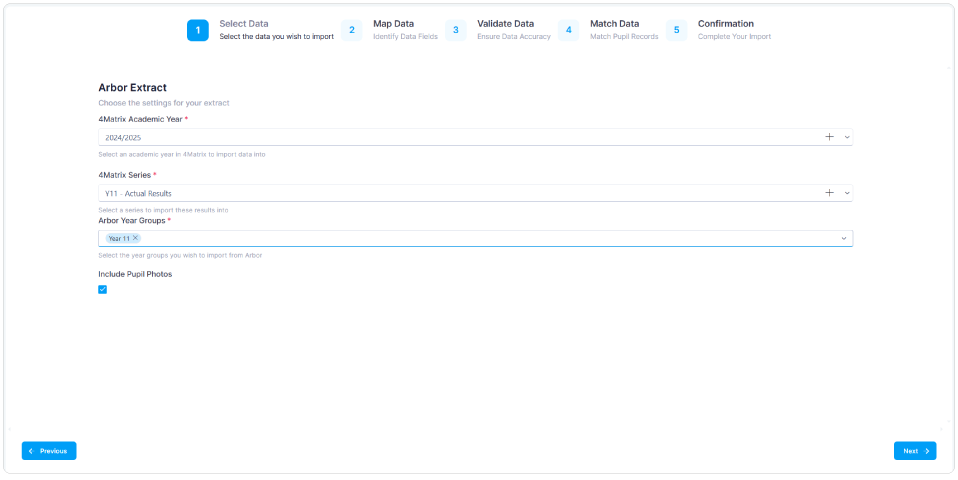
2. Creating your Results Series
- In this step of the import, confirm the Academic Year and Series settings.
The Series settings will be determined by whether a Results Series has been created in advance, as per the Pre-Checks article.
Scenario 1: Results Series has been created in advance
- In the 4Matrix Series field, select your Results series. Spreadsheet users now go to Mapping Data
- In the MIS Year Groups field, select Year 11
- Click Next to proceed to the next step. MIS users go to Running the MIS Extract;
Scenario 2: Results series has not been created in advance
- Click on the + icon to create a new series. You wil see the following dialogue (see below for additional steps to match these settings):
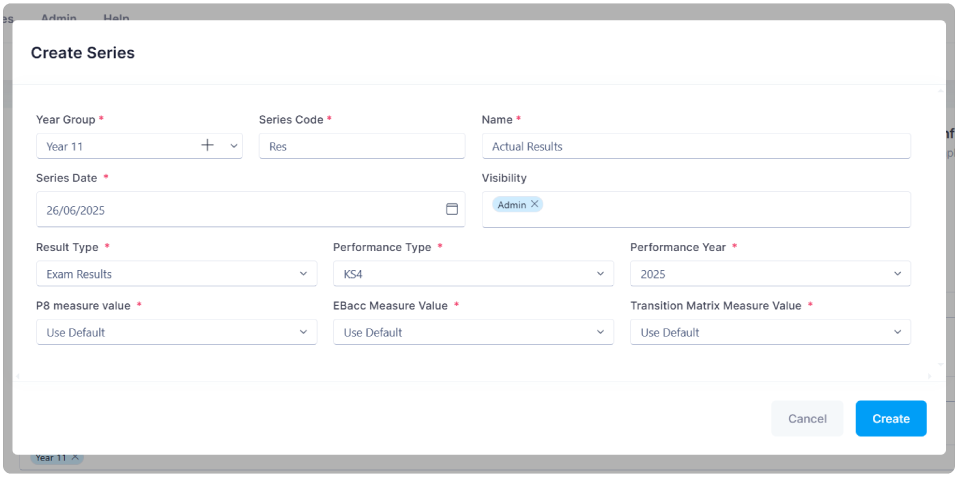
- Select the year group to link the series to - Year 11
- Enter/type a Series Code and Name
- Set Series Date to the date before students went off roll: 26th June 2025
- In the Visibility field, select Admin and/or Exams Embargo (or roles of your choosing, in line with JCQ guidance)
- All performance measure fields are pre-populated; click Create to return to the previous dialogue. Spreadsheet users now go to Mapping Data
- In the MIS Year Groups field, select Year 11
- Click Next to proceed to the next step.
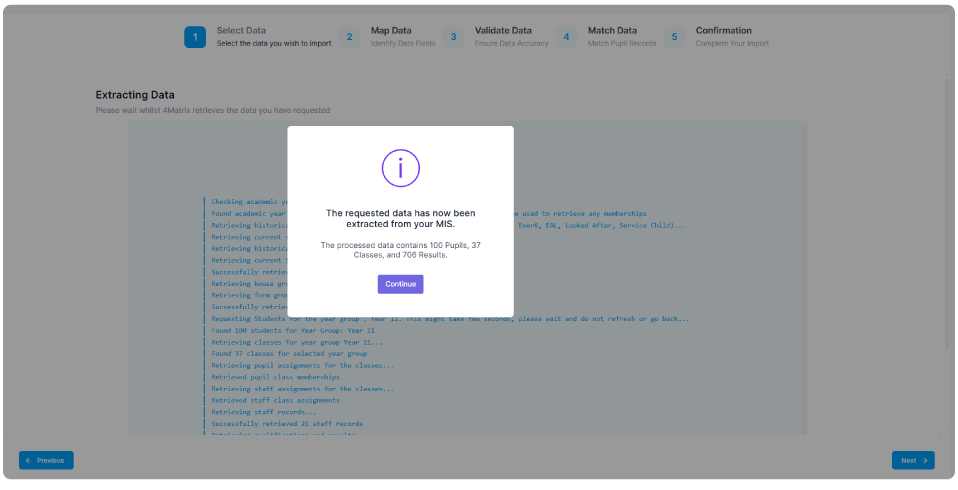
3. Running the MIS Extract
- Wait while the data is extracted.
- On completion, a message will appear with the number of students, classes and results that have been extracted.
- Select Continue and Next.
4. Mapping Data
- Data must now be mapped, validated and matched in the usual way.
- First, the data fields are mapped (e.g. Forename, Surname, Sex, Course columns). Most - if not all - fields should map automatically.
- Next, map Courses. Mapping should occur automatically where a QAN that has come from the MIS matches an existing Course with the same QAN in 4Matrix.
- 4Matrix will not auto-map if it is unsure – e.g. the QAN is correct, but the Course name in 4Matrix is different; or if there are 2 QANs against a single Course.
Although mapping will occur automatically where the QAN has come through on the MIS extract, you must check and confirm the mappings are correct before proceeding. Failing to do so may result in duplicate Courses.
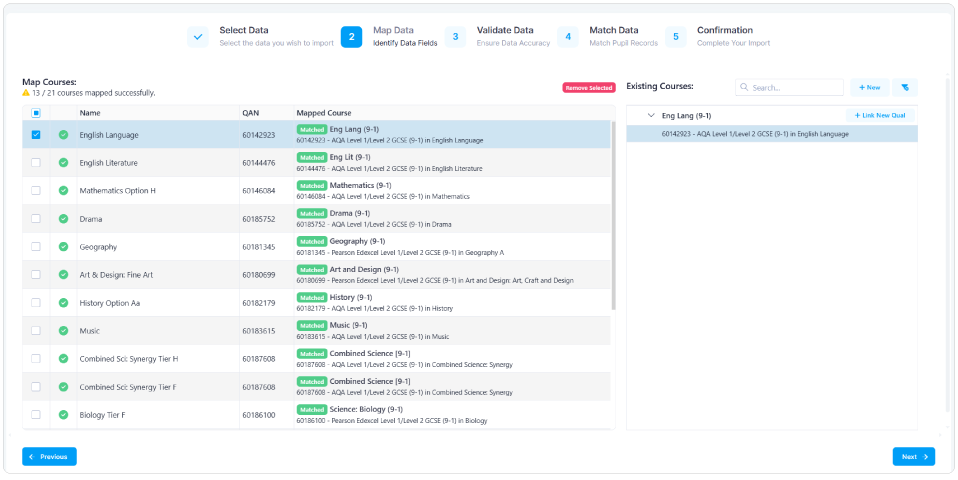
- Green ticks will denote where a subject from the MIS has succesfully mapped to a Course in 4Matrix based on the name and QAN code, either automatically or after user-intervention. Change the mapping if it is not correct.
- Red courses are where they have not been automatically mapped, and you should manually map these Courses.
- If you have any Courses which are not included in the DFE qualifications list (e.g. English Entry Level), these cannot be imported and must be removed using the Remove Selected option.
Notes on mapping split-level subjects (Higher/Foundation)
- Depending on setup, the MIS Extract may import separate columns for split-level subjects e.g. Maths Foundation and Maths Higher.
- Both columns can be mapped to the same Course. However, if a student has a grade in both columns, the grade from the last column will be imported.
- 4Matrix can't auto-map both columns for subjects where there are tiers – map both tiers to the same Course manually.
Once you have checked the mappings carefully, click Next to move on to the Data Validation step.
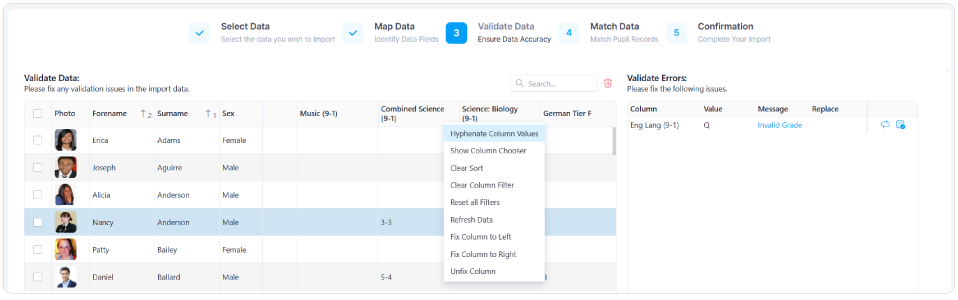
5. Data Validation
- During the import, all data items are validated against what 4Matrix is expecting to receive from each column.
- In most cases, data should validate correctly and you can proceed to the next step without intervention.
- If 4Matrix detects any values it is not expecting e.g. a value of A in a 9-1 qualification column, this can be adjusted at this stage of the import.
- To make corrections, either edit the value in the main window of the import (like you would in a spreadsheet), or use the right-hand panel to make bulk adjustments.
- When using the right-hand panel, the circular arrow icon replaces a single value. The tick-list icon changes all the same values in the affected column.
- Combined Science is a common problem at this stage because the MIS may have the grades stored without the hyphen e.g. 55 instead of 5-5. You can fix this by right-clicking the Combined Science column header and choosing 'Hyphenate Grades'.
6. Match Pupils
- All pupils should match automatically to existing records in 4Matrix, unless this is your first import. If it is not your first import and pupils are not matching, please contact us for assistance.
- If this is your first import, select all pupils and then choose the Mark as New Pupil option.
Once pupils are matched, click Next to complete the import.
If you have any missing subjects or results from your MIS import, these can be added later via a spreadsheet import. You can repeat the import process as described here to add them to the Results Series.
Performance Measure Notes
1. Early Entries and Pathway Discounting
Please refer to the DfE KS4 Accountability Measures for more information on early entries and discounting, including pathway discounting.
2. General Discounting Rules and Result Dates
Where a student has studied 2 subjects from the same 'family' of awards, it is the first entry that counts in performance measures. This is determined by a subject's Discount Code. The student will still receive both results.
In 4Matrix, we use the Exam Result Date to determine which grade should count towards performance measures (for applicable students). The MIS import in 4Matrix collects different information from each MIS:
Arbor: Results will be date stamped with the date that each exam grade was added to Arbor, NOT the date the exam was sat. This is significant because it means that 4Matrix may not be able to automatically apply correct discounting. If the date is not available, the date of the import will be used.
Bromcom: Results will be date stamped with a ‘Season’ date, NOT the date the exam was sat. This is significant because it means that 4Matrix may not be able to automatically apply correct discounting. If the date is not available, the date of the import will be used.
Spreadsheet Imports: Results will be date stamped with the date of import. Once you have imported your series into 4Matrix, you should check how your qualifications are being handled and their discount codes.
To view the grade dates and make any necessary adjustments, please use Admin > Edit Results. Use the Enable Edit Mode option to make changes and then Save.
3. 2025 Performance Measures
Due to the unique circumstances surrounding the Class of 2025 (current Year 11), who did not sit KS2 SATs in Year 6 because of the COVID-19 pandemic, the baseline data required to generate reliable Attainment 8 (A8) estimates for the Progress 8 measure is inconsistent.
The Department for Education has confirmed that the 2025 performance tables will not include Progress 8. For confirmation of this and to see the full list of KPIs that will be reported, see DfE KS4 Accountability Measures – p.11.
Some schools have used proxy KS2 results to monitor progress. If you wish your summer 2025 Actual Results series to display zero for all Progress 8 measures, in line with the DFE, you will need to navigate to Admin > Edit Markbook and clear all KS2 results using Clear Column.
Checking your Headline Figures
Do not report the information shown in 4Matrix without separately verifying it using other methods. We will not accept responsibility for the consequences of publishing incorrect information, however caused.
- In Press Release, check that the number of pupils in your cohort is correct and you have the correct entries for English, Maths and Science.
- In Performance Tracking compare your Actual Results series against your latest Predictions series and check the number of students and total number of entries.
- In Grade Breakdown, check that all subjects are present and the entries match what you are expecting.
- In Course Summary, check the subjects listed, the number of entries and APS against your last set of tracking data. There will inevitably be some differences but if there are any missing results, check Course Comparison for a student-level comparison, or re-import for a missing subject.
Producing Reports
The Press Release tool will report the main headline figures for your school. This report is ideal for SLT.
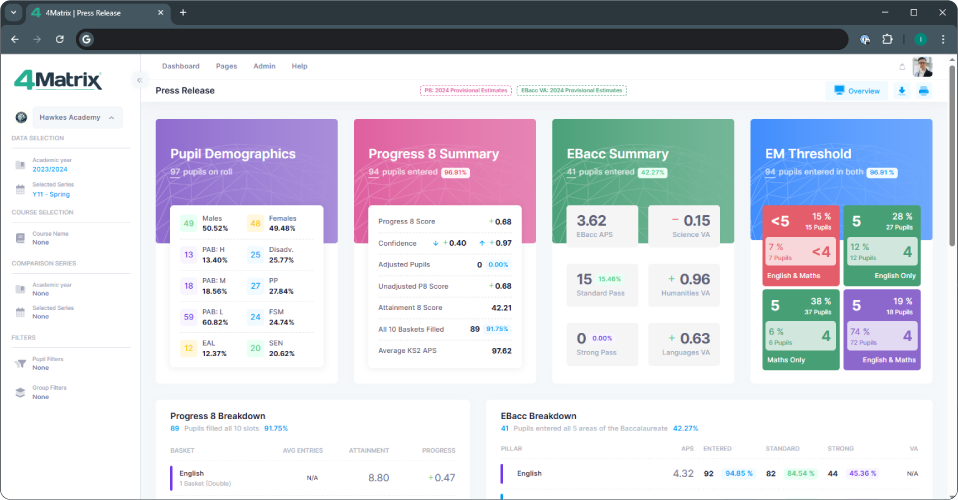
We expect to add a print option for the Press Release tool prior to results days. In the meantime, you can screengrab this tool and paste the image(s) into a separate application (e.g. PowerPoint) and print from there.
Most grid-based tools e.g. KPI and Results Overview provide an Export option in the top-right of the display.
Useful links
- DfE KS4 Approved Qualifications
- EBacc Qualification
- DfE KS4 Accountability Measures
- JCQ Release of Results June 2025 document
If you require any further advice, please contact us via the helpdesk.
- First published: 18/07/2025
- Last revised: 20/08/2025