Quick start guide for admins
In this topic, we work through some of the first admin-related tasks you'll want to complete. In this topic:
- Activating your 4Matrix Cloud site
- Logging in
- Navigation - Basics
- Navigation - Data Selection panel
- Adding your school logo
- Creating and Managing Users
- Creating and Managing KPI Views
- Importing Data (MIS extract)
- Importing Data (Spreadsheets)
- Recommendations
If you experience any problems with logging in or using 4Matrix Cloud please log a ticket or contact us via our Live Chat service.
Activating your 4Matrix Cloud site
The first time you use 4Matrix Cloud
4Matrix staff will setup your school's 4Matrix Cloud site and database, using the main contact's email address. The main contact is automatically assigned the Admin role in 4Matrix Cloud.
The main contact will receive an email asking them to activate their account. Following the 'Confirm Account' link will complete the site activation and prompt the user to set a password for their user account, after which they can sign in by typing their email address and password, or by using the Single Sign-on option if it is a Microsoft or Google account.
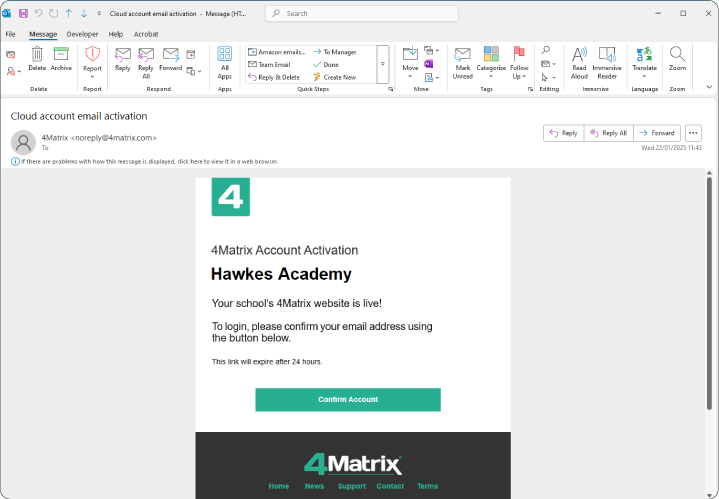
- Do not share the account activation email with other members of staff.
- The Admin user(s) will create additional users as required. See the Creating and Managing Users section later in this topic for more details.
- The confirm account link contained within the user activation email expires after 24 hours. If 24 hours have passed, please contact us and we will re-issue this.
Logging in
After activating your account go to the sign in page. Supply your email address and password, or use the Single Sign-on option if it is a Microsoft or Google account.
Remember Me: This option bypasses the need to login again from within the same browser session e.g. if switching between multiple tabs. If the browser is closed or the session timeout automatically logs the user out due to inactivity, the user will be required to login again regardless of this setting. Not applicable to SSO login.
Navigation - The Basics
On logging in, your site will open on the Dashboard. This includes information about your licence, links to help and support resources, and quick-links for classes and year groups.
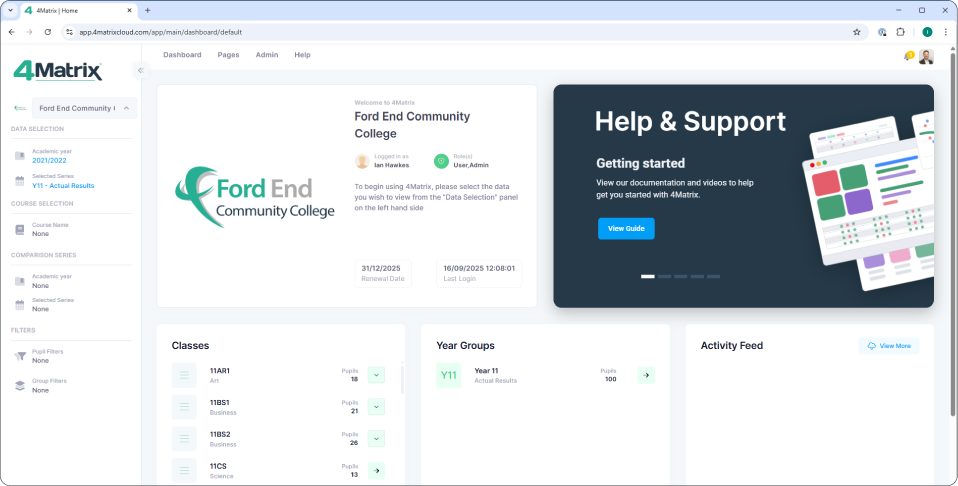
- School Details panel shows your school logo, user role, last login date, and renewal date.
- Help & Support panel provides links to guides, support tickets, live chat and events/webinars.
Once you have imported data, the Classes and Year Groups panels will populate.
- Classes - The classes linked to the logged in user are displayed here. This helps personalise the view for teachers. Note: All classes will show unless the user is linked to a 'staff tag'.
- Year Groups - Will open the Press Release for the 'Default' series for the selected year group (more information on this later)
In the top-right of the screen:
- User profile is in the top right corner to view your details and make changes (such as changing your password).
- Message notification 'bell' will popoulate with notifications as data is imported; it confirms various stages of the import are complete and calculations are finished.
The 4 main tabs along the top of your site:
- Dashboard – Returns you to your landing page.
- Pages – Links to all analysis tools, grouped by overview and course-driven tools.
- Help – Will take you directly to our help/support ticket website.
- Admin – Will only be visible to Administrators (or any role with access to the Admin tools) and contains all of the admin tools you will need to manage your site and the data contained.
Multi-Tab Browsing
- Right-click any link in 4Matrix Cloud (including links within the Admin and Pages menus) and select 'Open in new tab'.
- If your mouse has a scroll wheel, when hovering over any link, click the scroll wheel to automatically open the link in a new tab.
Navigation - Data Selection Panel
The settings applied in the Data Selection panel (to the left of the screen) control which data you see. The options in these controls become available once you have imported data. They do not need re-applying as you switch between tools (unless you want to view a different series/AC year/filter, etc).
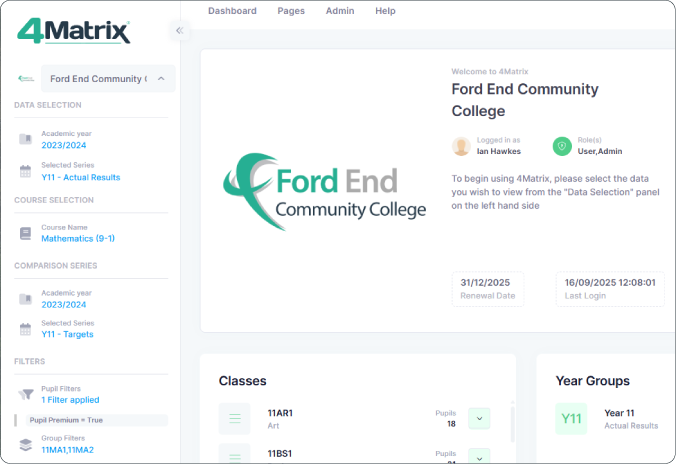
- School Name Selector – Allows users linked to multiple schools to switch between their schools.
- Data Selection – Choose the AC Year and selected series you wish to view.
- Course Selection – Choose a subject for all course-driven tools. This is disregarded when viewing 'overview' tools that show all courses and/or pupils.
- Comparison Series – Select a second series to show on screen in tools which contain a comparison feature.
- Filters – Set simple or advanced filters that will remain in place for all tools, based on pupil demographics and/or any group type.
Clearing your settings: Simply hover over the applied setting (showing in blue) and select the small X icon that appears. Note: this option does not appear on the main AC Year and Series options.
Working with Pupil and Group filters is covered in the Quick Start Guide for Analysis.
Adding your School logo
Adding your logo takes seconds and will help personalise the use of 4Matrix across your school.
- Hover over the Admin tab at the top of the screen and select the blue Manage button
- In the screen that appears, select the Edit tab
- You'll see the logo edit options. Click the small pencil icon next to the generic image, and 'open' your school logo image file.
- The change is instant; return to the Dashboard to see your logo!
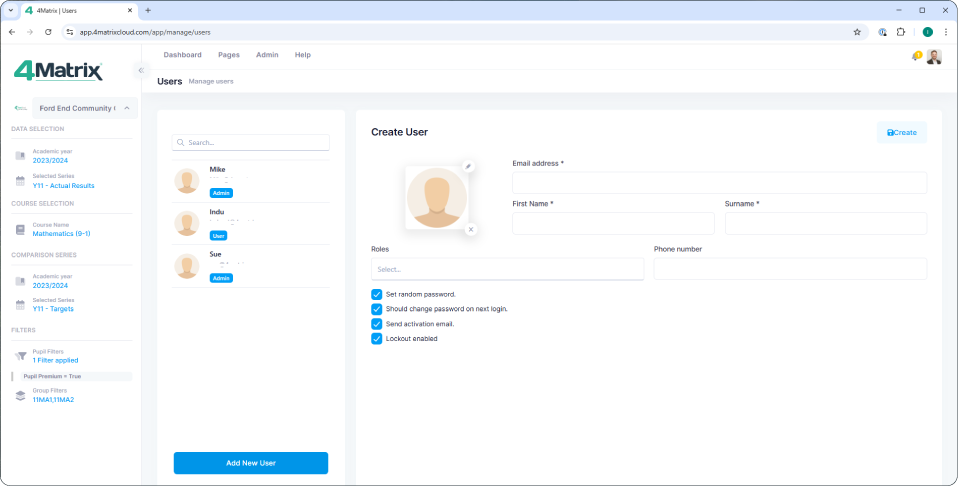
Creating and Managing Users
Additional users can be added quickly, and there are two ways to do this:
- Import a spreadsheet of email addresses
- Add users manually via the Admin > Users tool.
If you need to add one or two users right away, we suggest using option 2. The process is straightforward:
- Go to Admin > Users.
- Select Add New User.
- Enter their email address and name, and press save.
- Choose a Role - this will either be Admin or User, unless you have already created custom roles. Note that the Admin role encompasses the User permissions, as well as granting access to all Admin tools.
- Click Create.
- Each new user you have added will receive a unique user activation email that they must complete within 24 hours.
For a more detailed guide on managing both users and roles, including importing users from a spreadsheet, please see the dedicated Managing Users topic.
Creating and Managing KPI Views
The default KPI view includes a large number of groups and the performance of students within them, including Sex, Pupil Premium, SEN, Disadvantaged, Attendance, and more.
4Matrix Cloud allows you to build your own KPI views to make them more relevant to different staff roles. You can create as many views as required, and use as many (or as little) groups within each one e.g. a custom SEN view might only include the SEN filter rows, and a gap between All SEN and No SEN.

To create and manage your KPI views:
- Go to Admin > Settings > KPI Settings.
- Select Add KPI View and give it a name, code, and performance type, and save.
- Select the newly created KPI view from the list on the left and choose Add Default Rows
- Delete any rows that you don’t want by clicking the red cross next to the row.
- Use the Add New Group option to add any additional filter groups or comparisons you require.
- Select Update.
- To make a new view the default view setting for users, select the view from the list on the left and choose Make Default.
Custom KPI views can be used in both the KPI and Course Overview tools.
Importing Data
We recommend importing your most recent exam results data first. If you use Arbor or Bromcom, this can be done via an MIS extract. If you do not use either of these MIS, please skip to the next section.
Go to:
- Admin > Import Data
- Choose your MIS and select Exam Results.
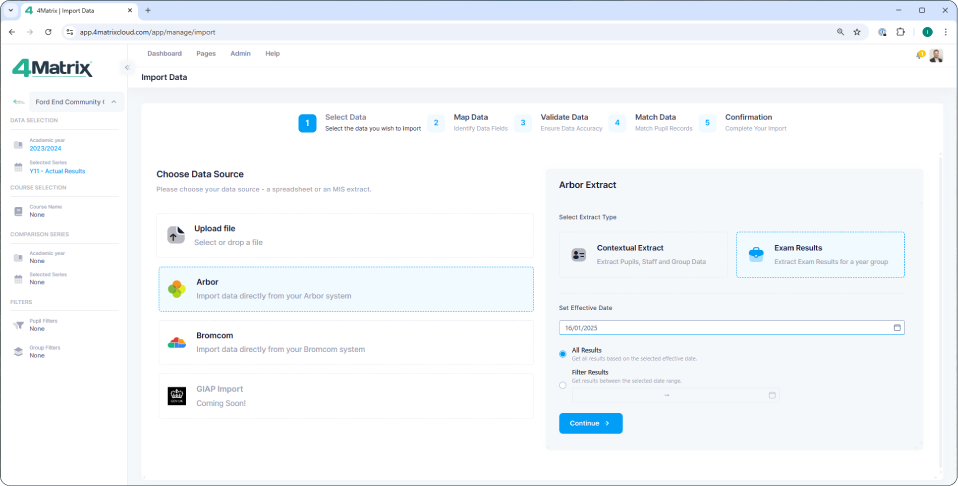
If you do not see your MIS listed on the import page, please refer to our dedicated MIS Connections topic. Pause on the import for now and come back to this page when you're ready.
- Select an Effective Date; This should be the January Census date.
- Choose All Results > Continue
- Choose or create the correct AC Year, using the + icon to the right of the AC Year field
- Create a new Series using the + icon to right of the series field
- Select the Year Group to extract from Arbor (choose Year 11 for this exam results import) and click next to begin the extract.
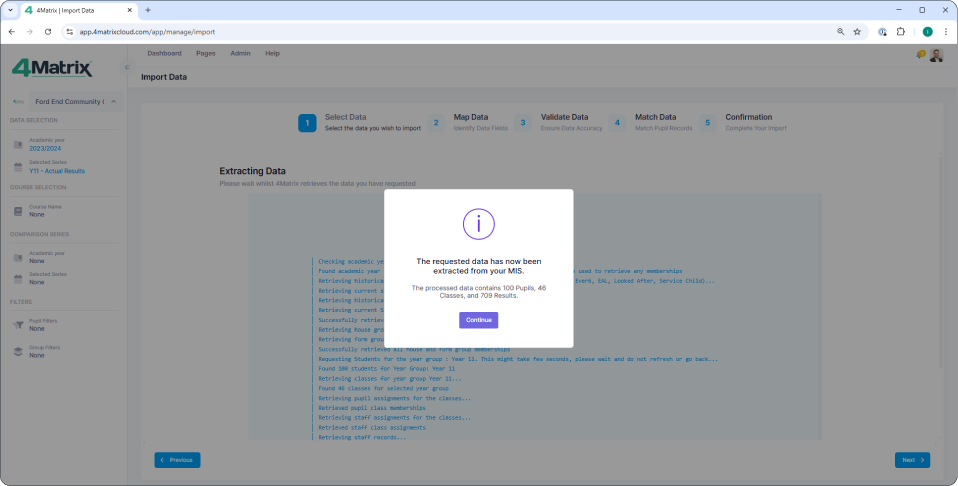
Follow the wizard to the Map Courses screen. As your system is new, you will not see any existing courses.
- 4Matrix will create the courses automatically (as far as possible, using the QAN and title from the exams module in your MIS).
- The names can be changed later in the 4Matrix Admin > Courses tool.
- Move on to Validate Data. Note that if you offer Combined/Double Science, there is a 'hyphenate values' option on right-clicking the science column header.
- In Match Pupils, if this is your first import for the cohort, select all pupils and choose 'Mark as New'.
- Finish the wizard.
- Once the import is complete, view your data. Use the Data Selection panel to select the AC year that you just created, choose the series, and go to Pages > Press Release (or any other tool from this menu).
- We now recommend going to Admin > Courses and updating your course names. We recommend using a simple naming convention e.g. English Language, Mathematics, Business BTEC, etc.
Course Mapping Notes
- Courses that come through separately from your MIS as Higher and Foundation tiers should be mapped to same QAN. They will be merged into a single course (column of results) on completing the import.
- Multiple pathway QANs (e.g. Art) will require you to choose the pathway – we recommend creating separate courses for these, especially for Art and Photography as they use different discount codes.
- Link New Qual opens a new window to allow you to add an additional QAN to a course, if required.
- Check it's included in performance measures. If it's not included, you will need to select it and choose the 'Remove Selected' option in the top-right of the table.
- If the course is included, copy the QAN code, click on the dots near the search bar and select ‘New’.
- In the pop-up, give the course a name, code (short name), ignore or link a relevant subject. Click Next.
- In the Select Qualification box, search by QAN, title, exam board or any combination.
- Select the correct QAN and Save.
- Your new course will appear in the list of existing courses – now ‘map’ the relevant row of results to your new course. Repeat for all rows until all are shown in green.
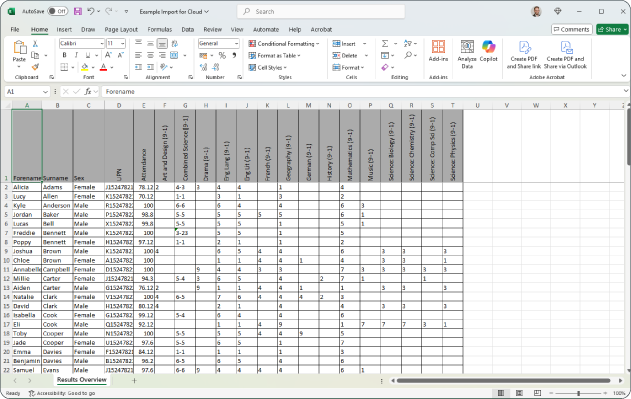
Importing Data - Spreadsheets
Regardless of whether 4Matrix is linked to your MIS, termly assessments will be imported via spreadsheets. This will likely be followed with a second import from your MIS using the 'Contextual information only' option, to update pupil details and classes.
Spreadsheet setup
- Column headers across the top for data items
- Pupils listed down the left hand side
Your spreadsheet must include columns for:
- Forename
- Surname
- Sex
- UPN
- Course names
Optional columns can include:
- Attendance
- Authorised Absence
- Absence
- Demographics (although this will come from your MIS import)
If this is the first time you're importing data, we recommend going to Admin > Courses and creating your courses in this tool before starting the import process. It will help speed up the import process.
Go to:
- Admin > Import Data
- Choose Upload File.
- Click in the large grey box area and 'open' your spreadsheet file.
- Choose Results from the Data Type options.
- Choose or create the correct AC Year, using the + icon to the right of the AC Year field.
- Create a new Series using the + icon to right of the series field.
- Follow the wizard to the Map Courses screen.
- Assuming you have created your courses in advance, 4Matrix will auto-map as far as possible, based on matching the names from your spreadsheet with the course names in 4Matrix.
- For any courses that have not auto-mapped, you should select each course in the middle of the screen and double-click the corresponding existing course shown on the right-hand side.
- In Match Pupils, if this is your first import for the cohort, select all pupils and choose 'Mark as New'.
- Finish the wizard.
- Once the import is complete, view your data. Use the Data Selection panel to select the AC year that you just created, choose the series, and go to Pages > Press Release (or any other tool from this menu).
Recommendations
Key Stage 2 Scaled Scores
- These can be imported using a spreadsheet. In the Map Data step of the import, choose 'Markbook Result' as the column type and you'll see options for Reading and Maths Scaled Scores.
Attendance
- Can be imported into each series using a spreadsheet. In the Map Data step of the import, you'll see options for Attendance, Authorised Absence and Unauthorised Absence.
Course Names
- If you've imported exam results from your MIS, make sure you visit the Admin > Courses page to review and edit your course names. We recommend using a simple naming convention, without exam board names in the course titles.
- It's also important to ensure all courses are linked to a subject ('subject tag').
Users and Roles
- Make sure you visit the Staff tool and use the 'Linked User' feature to complete the link between users and their staff tag. This will enable the feature on the Dashboard where teachers can see their own classes.
- We recommend creating custom roles for your users. This feature can be used to cherry-pick specific tools to make 4Matrix more accessible, and can be used to 'drip-feed' tools to staff if you're training them. For example, you may wish to hide some of the headline measure tools from teachers.
Series Visiblity
-
Series Visiblity is controlled via the Role(s) that a user belongs to. You can define the roles setting at the start of a new import for a series, and retrospectively in the Admin > Series tool. This feature is useful for embargoing exam results series.
-
First published: 19/09/2025
-
Last revised: 02/10/2025